


[3.9] Physical Conversion Bowyer | Wander [TS/LA/IS + Barrage] [KB + Power Siphon] [All Content]
|
Post 1
Both phys conversion guides include trade links for every slot requiring a rare item. This is mainly to help reduce the frustration for newer players trying to gear up, but I think it'll be useful for everyone following the guide. The phys conversion wander is a decent league-starter and with some investment, is capable of doing all content including Sirus 8 provided you have a solid grasp of fight mechanics. If you have >20 ex to burn, I suggest transitioning to either phys conversion bow (2-3x higher DPS ceiling) or int stacking wander (much higher tankiness). In its current state, phys conversion wander in league is cheaper than bow and int stacking to reach end-game levels of damage, but also has a much lower damage/survivability ceiling once you reach higher levels of investment. -- this guide is meant for temp league players, so no legacy items are included. Phys conversion bow/wand are popular mirrored builds but very little in this guide is applicable to those setups. If you're interested in playing a standard mirrored wander, post your budget here and I will suggest a setup for you (I recommend having at least ~1000 ex excluding legacy vinktar; check post 3 link). If you're interested in mirrored bows, use the POB from Mai_Cedere's mirror service thread -- Posts 1-2 cover Physical Conversion Bowyer Posts 3-4 cover Physical Conversion Wander >>>>>>>>>>>>>>>>>>{ Physical Conversion Bowyer }<<<<<<<<<<<<<<<<<< 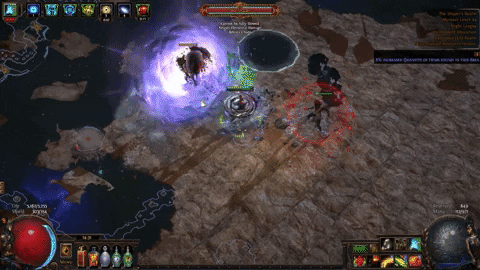 *Gif is outdated in 3.9 due to massive boss life + resist buff* 3.9 Update
Spoiler
So far, there haven't been too many changes in 3.9. I've modified the tree a little to get more life at the cost of a little less DPS. I've also gotten rid of Lioneye's Fall from the setup and used those points to take Revenge of the Hunted + Forces of Nature instead. This is overall a bit less DPS, but more life. I think the latter is more important this league and DPS will be fine without Lioneye's.
Since GGG hasn't nerfed Voidfletcher yet, we can continue to abuse its ridiculous single target mechanics, but keep in mind this item isn't essential for the build to function. It's just a very nice QOL/DPS boost. Some other notable changes in 3.9 are explained below. - I don't recommend starting out with this build, because it requires items not available until at least several days into league. Either play it as a mid-league build or transition from a different ranger build such as the phys conversion wander later on when the gear becomes available. - even though multimod is nerfed, you can still continue using rare gloves now w/ more resists in the suffix slots instead of the previous DPS mastercrafts from 3.8; 20-25% phys to cold conversion is still the most important mod. If you decide to use rare gloves you must have Hatred Conversion Watcher's Eye. This is why I recommend using Hrimsorrows instead because if you plan on using Voidfletcher, Hatred Conversion eye is useless for scaling its DPS since Void Shot itself already has built-in 50% conversion. - in my opinion, the best option now for most setups is Hrimsorrow especially w/ a good corruption such as base crit/ele weakness on hit/attack speed. You won't be able to reach 100% conversion so phys reflect maps aren't doable, but you can use Hatred Pen or Precision Multi Watcher's to reach higher levels of damage by scaling both your Barrage + Void Shot. Even a regular pair of Hrimsorrows + Hatred Pen Watcher's will still give more DPS than well-rolled rare conversion gloves + Hatred Conversion Watcher's if you're using Voidfletcher. The drawback is you have ~150 less life and no phys reflect immunity. For those who don't want to use Voidfletcher or can't afford to, rare conversion gloves + Hatred Conversion eye is more comparable to Hatred Pen/Precision Multi in terms of DPS. - if you decide to use rare gloves you must have Hatred Conversion Watcher's Eye in order to reach 100% conversion for your Barrage. Those with Hrimsorrow + other types of Watcher's Eyes will only be able to reach 90% conversion, but still have more damage overall. - I've included a setup without Dying Sun, Lioneye's Fall, Voidfletcher, or Watcher's Eye and the DPS should still be enough for all content. This is the more "budget" setup and can serve as a temporary setup too for those who eventually plan to get those more expensive uniques. Introduction - Reviving SignalShot™
Spoiler
Phys conversion bowyers were once the most overplayed meta build in all of POE; pretty much every veteran of the game can recall the pre 3.0 days of Signal Shot CI instant leech builds dominating the meta. Sadly, with nerfs to Vaal Pact, Vinktar, Reach of the Council, etc. this archetype has since faded into obscurity in temp leagues. The last guide about phys conversion bows that I could find hasn't been updated since 3.3.
Here's a link to the original Signal Shot build for those wishing to indulge in some nostalgia. Good times... RIP https://www.pathofexile.com/forum/view-thread/1745340 The thing is, phys conversion bow builds are still extremely strong. With each patch they've only gotten stronger. Back in the day you needed a ton of currency to get a phys conversion bowyer working. Now, due to gradual power creep over the years, barrier of entry has been significantly reduced along with having a higher dps ceiling. It's arguably one of the cheapest bow builds out there for doing all content. This guide is my attempt at updating "Signal Shot" for the modern era while taking a lot of creative liberties, obviously because we have a lot more toys to play with nowadays. The emphasis, just like in the OG version, is on tackling all content. No, we aren't using Signal Fire quiver + Phys to Lightning gem anymore b/c there are way better options, but the iconic name still sticks, and the underlying damage-scaling concept remains the same. Build Explanation
Spoiler
We use a bow with high physical flat damage and convert all of it into cold damage.
But why not convert into all three elements? The reason is efficiency, because if all your damage is converted into a single element, you can scale it using just one type of penetration. This is overall better for damage. But why convert in the first place? Why not just play ele bow? Once physical damage is converted, it can be scaled using both physical and elemental multipliers. This means we can mix together the best multipliers each damage type has to offer, resulting in a higher dps ceiling. Ele bows are more expensive to craft, and have a much lower dps ceiling unless you go the dex stacking route. As a phys conversion build, you can also take full advantage of Taste of Hate + Loreweave. Both make you a lot tankier than ele bow builds. But that's not all... Phys conversion bows are also in the perfect position to take advantage of the Voidfletcher quiver. This quiver is extremely broken due to the Void Shot skill. It not only helps clean up mobs during map clear, but also provides a huge amount of single target burst damage. Here's how it works. Every 0.5 seconds, you gain a Void Charge up to a maximum of 5 charges (2.5 seconds to ramp up). Each Void Charge grants one use of the Void Shot skill. Every time you fire an arrow, you automatically expend one Void Charge to fire Void Shot, which then explodes dealing 240% base damage. There are only two ways to scale Void Shot. One is with additional arrows, which leads to more overlapping explosions. The other is by increasing your Damage per Hit, which directly scales the damage from the explosion itself. This is why phys conversion is so great. Not only does it have extremely high damage per hit, but all the bows with additional arrows are phys bows. We use Arborix because it provides a ton of flat phys, and on top of that you get 2 additional arrows. With Arborix and Dying Sun flask, you get a total of 6 arrows. This means that each Void Shot generates 6 arrows that go on to create 6 overlapping explosions, each dealing 240% of your base damage. But there's more. Because Void Shot triggers each time you fire an arrow, Barrage is the perfect skill for proccing it. Each Barrage attack fires 11 arrows, so in less than one animation, you will trigger Void Shot 5 times. This takes ~0.2 seconds. So to summarize, you fire 5 Void Shots in ~0.2 seconds, each Void Shot generates 6 arrows. Each arrow generates one explosion dealing 240% of your base damage. In total you are unleashing 30 arrows --> 30 explosions within the time span of ~1 second when accounting for explosion delay. Here's what it looks like: 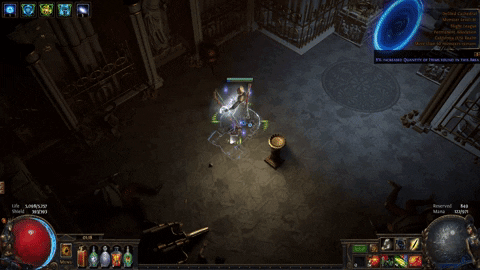 That explosion represents 30 Void Shot explosions going off simultaneously. Unless a monster has millions of life, it will instantly die. Here's what it looks like in action against Minotaur. Notice the sudden drop in life when Void Shot goes off.  This initial discharge of 5 Void Shots is equivalent to a 60-70% MORE damage multiplier for the first second of the fight. Afterwards, you will still consistently fire 2 Void Shots per second while Barraging. This is equivalent to a 20-30% MORE damage multiplier on top of the high flat cold and other useful mods from the Voidfletcher quiver. Both Arborix and Voidfletcher are uniques so it's easier (relatively speaking) to get +1 arrow corruption on both, which means even more damage... Keep in mind this isn't our main source of dps either. You're still dealing millions of dps from Barrage alone due to phys conversion mechanics. The Void Shot dps is just a very nice added bonus so may as well take advantage of it before it gets nerfed. Videos
Spoiler
3.9 T16 Phoenix run
3.9 Shaper kill 3.8 2 minute Deathless Uber Elder on 1-Link - Voidfletcher hard carry 3.8 Deathless Uber Elder with 4-Link (NO VOIDFLETCHER) - this is just to prove that build doesn't need Voidfletcher to function. Phys conversion alone deals plenty of DPS. 3.8 Rippy T16 Minotaur Run w/ Ice Shot Pathfinder 3.8 T16 Chimera Run w/ Tornado Shot Pathfinder (all smoke phases skipped) 3.8 Deathless Uber Elder w/ Voidfletcher Pathfinder 3.8 Deathless Uber Elder w/ no Voidfletcher Pathfinder 3.8 T16 Phoenix Run w/ Lightning Arrow Pathfinder 3.8 Sample Gear (outdated)
Spoiler
This is the gear used in all 3.8 videos on this guide. Total cost around ~25 ex. I'm only leaving this up b/c it hasn't changed too much
Pros and Cons
Spoiler
Pros:
- fast clearspeed - can swap between 3 different clear skills for fun - can easily do all content up to Uber Elder - tankier than all bow builds except possibly Impale, but you move faster + have perma flask sustain - ailment immunity Cons: - not recommended as a day 1 league starter, but you can start as phys conversion wander and easily switch to bow later in league - gear can be sort of expensive? but cheap compared to most meta high DPS bow builds - piano flasking - not an immortal facetank everything build; you'll have occasional deaths while bossing, but can facetank pretty well most of the time Map Mods
Spoiler
Can run all map mods except for no leech and reflect. 90% ailment avoidance isn't as satisfying to run b/c you don't get the juicy crit shatters so I typically skip those, but they're easily doable. Be a bit more careful when running %less life recovery maps and probably use a life flask.
POB Pastebin
Spoiler
Voidfletcher Setup (High End)
https://pastebin.com/rdU2wJ4W - the gear in this POB is more expensive b/c I'm assuming you'll have better gear if you're able to afford a Watcher's, Dying Sun, and Voidfletcher. This also includes DPS calculation from Void Shot after the initial burst. If you want to know the DPS from the initial burst, multiply what's shown on POB by 1.3 Rare Quiver Setup (High End) https://pastebin.com/WPGMpujr - the gear here is identical to the Voidfletcher setup above except with a rare quiver and +1 frenzy replaced with +1 power. As you can see the DPS is actually a little higher and you'll likely have a slightly larger life pool. But keep in mind POB numbers don't include the initial burst from Void Shot which makes it superior to rare quiver, nor does it include the differences in playstyle that allow Voidfletcher users to die less often. More Budget Setup w/ Rare Quiver https://pastebin.com/daaiMWiU - this is DPS without Watcher's Eye, Dying Sun, Lethal Pride, Voidfletcher and some mods on gear tuned down. You should still be able to do everything up to Uber Elder Important MUST READS Before Starting
Spoiler
+1 Minimum Power/Frenzy/Endurance?
Spoiler
While gearing, you might have to make a decision about which minimum charge to mastercraft on your jewelry. Here's some relevant info on each so you know which one to pick depending on your playstyle.
+1 Minimum Power Charge: - gives the most dps on end-game bosses if you plan on using a rare quiver. - gives the most dps while mapping. - gives less dps on end-game bosses if you plan on using Voidfletcher. +1 Minimum Frenzy Charge: - gives the most dps on end-game bosses if you plan on using Voidfletcher. - gives less dps while mapping. - gives no dps on end-game bosses if you plan on using a rare quiver. +1 Minimum Endurance Charge: - 5% phys damage reduction gives added tankiness against Legion/Syndicate encounters as well as bosses that deal heavy phys damage like Minotaur/Chimera/Hydra, etc. This mitigation also applies to phys degen like Blood Rage/Bleed/Uber Elder degen. - +4% all resists = 12% total resists. Good for rounding out if you're near the resist cap. Physical Conversion Wand vs Physical Conversion Bow
Spoiler
Pros:
- Bows have enough flat phys to be a true phys conversion build. Wanders are pseudo-conversion b/c wands can't roll high enough phys. - Bows have a greater variety of skills that can be swapped around depending on preference/situation. - Bows have a much higher single target DPS ceiling. - Bow is better at Blight encounters due to constant knockback + better clearing dps, can sometimes be annoying when trying to facetank though. - Bow's equivalent of KB is Lightning Arrow/Ice Shot. - Mirage Archer kills shit for you; wanders have no equivalent. - Optional QoL Bow Swap (bow + dps quiver for boss, bow + Rigwalds for clearing) Cons: - Bow builds are more meta, so gear is usually more expensive. - Sometimes less tanky due to no shield + no proccing of Fortify, but Voidfletcher allows you to not have to facetank as often. - Slightly less mobility due to lack of Shield Charge and lower attack rate. - More socket starved. - Can't weapon swap to end Blood Rage. - KB is a sexier clear skill (totally not biased). Resist Capping!!! VERY IMPORTANT
Spoiler
The most common issue with underperforming setups is way overcapping on resists. There's no point getting above 78% lightning/fire/cold, because you use Warding flask for ele weakness maps. Every point of resist you get over the cap is directly contributing to lower dps.
You need 414% total resists to reach 78% per element. Alira bandit will give you 45%, so you actually need 369%. The helm slot should give ~120% resists and boots should give ~100%. Boots aren't too difficult to roll yourself if items on poe.trade are too ridiculous, just use deafening/shrieking essences of wrath/anger/hatred on a two-tone base til you hit decent life + move speed, and then mastercraft a 20% hybrid resist. Voidfletcher provides ~30% cold resists Taking all the above into account, you'd still need ~120% resists. If you dedicate 1 suffix slot on each ring towards resists, you can achieve another ~70%. This leaves you with ~50% resists left to worry about. To get the last ~50%, you can stack some on belt/jewel(s). Worst case scenario replace a second suffix on rings. If fire/cold are slightly undercapped you can try it out. Usually this isn't that big of a problem since Wise Oak or TOH + Dying Sun should be up 99% of the time, and for the other 1% when you aren't paying attention, you probably won't be hit anyways. Why Pathfinder? What about Deadeye?
Spoiler
Pathfinder is the best ascendancy for bossing because of permanent flask sustain and more tankiness against one-shots. You therefore have higher sustained dps for longer boss fights. You also get ailment immunity.
If you go with Deadeye, you'll have better clearspeed + burst dps. However, Deadeye is glassier b/c flasks won't be up all the time, no ailment immunity, and there's less damage mitigation from flasks/ascendancy, so it's definitely worse for end-game bossing. Because of the boss HP buff in 3.9, you should play Pathfinder if you want to boss at all; Deadeye will suck b/c of no flask sustain for these longer fights. Passive Tree/Bandits/Ascendancy/Pantheon
Spoiler
Lvl 96 Passive Tree (Pathfinder)
Pathfinder Ascendancy
Spoiler
 Nature's Boon --> Master Alchemist --> Veteran Bowyer --> Nature's Adrenaline Bandits
Spoiler
Alira is a must.
Pantheon
Spoiler
For Major God, upgrade Soul of Solaris for bossing.
For Minor God, use Upgraded Yugul for Uber Elder and Upgraded Shakari for everything else. Editado por útlima vez por Enahkra#7073 en 3 ene. 2020 15:41:48 Reflotado por última vez en 14 ene. 2021 1:49:51
|
|
|
Post 2
Gear
Spoiler
Bow
Spoiler
Arborix This is the best bow for phys conversion builds. While using it, you will alternate between two states every 8 seconds. One state gives more single target dps while the other gives more attack + movement speed and Far Shot. You also get 2 additional arrows for enhanced screen clear and synergy with Voidfletcher. %quality on this item is extremely important, so get 8% from Hillock in Transportation or 10% beast corruption (make sure it has white socket(s) and well-divined). Quiver
Spoiler
Voidfletcher - currently the best single target dps quiver. DPS isn't factored into POB. - Void Shot cleans up stragglers while clearing. - synergy with Arborix's +2 arrows since Void Shot damage scales with additional arrows. - works extremely well with Barrage, giving you a huge moment of burst damage at the start of a boss fight. - relatively common drop from Uber Elder, but since the fight is more gated behind RNG in 3.9, it'll be more expensive than in past leagues. - don't spam attacks right before a boss encounter so that you can build up to maximum charges. - additional arrow corruption is GG, but good luck ever getting it. Rare DPS Quiver *example is outdated for 3.9; will add new one later* This quiver is currently worse than Voidfletcher for DPS. Maybe it'll become #1 in a future patch when Voidfletcher is inevitably nerfed. The most important mod is "frenzy charge gained on crit". This will bring you to max frenzy charges very quickly during any boss encounter. Shaper quiver is the best to craft on because there's a chance to roll +1 additional arrow. For some setups, Broadhead base is slightly better than Spike-point. You have two options Option 1) Look for one on the trade link provided below. Option 2) Alteration spam an ilvl 80+ shaper Broadhead/Spike-point base until you hit +1 additional arrow. Aug/regal for a decent 3-mod combination rare. This may take a few attempts. Then multimod the following two crafts: hybrid crit chance + frenzy charge on crit + attack speed. If you can't afford to multimod, make sure your quiver has +1 arrow and at least the frenzy charge on crit mod. You can also look for some quivers with +1 arrow + some decent mods already, annul for an open suffix and then mastercraft frenzy on crit. 3.9 Trade Link for Rare Quivers
Spoiler
https://www.pathofexile.com/trade/search/Metamorph/oplK7krsl
All quivers in this search have 50+ flat life and an open suffix for crafting "frenzy charge on hit". This mastermod is mandatory. Adjust the "Min" value depending on your budget. I've set the default at 1 million. This number represents roughly how much DPS the quiver will give an average build. Keep in mind some combinations of DPS mods will beat out +1 arrow for single target damage, but you'll lose out on the extra arrow from your clear skill. So depending on your personal preference, +1 arrow might be acceptable even if it gives less single target DPS. Rigwald's Quills - best quiver for map clearing. - those with a lot of currency can use this while clearing the map and then swap to offhand dps quiver + bow for the boss. Helm
Spoiler
Rare Essence-Crafted 120%+ Res helm w/ High Life and Barrage Enchant - since single target is the priority here. I recommend getting a +1 barrage base if you plan on doing mostly endgame content. Otherwise you might want to consider a clear skill enchant like "T-shot additional proj" or "LA hits 2 additional enemies". - use essences to craft a helm capable of providing 120+% resists + decent flat life. (instructions below) - average cost of crafting one with essences is ~1-2 ex. This is pretty cheap for a +1 enchant helm, considering most unique helms with the same enchant cost multiple exalts. - just keep in mind that the less resists you stack here, the lower your DPS ceiling will be. Crafting the Rare Helm
Spoiler
Buy a +1 barrage enchant base (evasion/armor are easier to roll than ES). Make sure it's at least ilvl 72+, ilvl 84+ is recommended. Avoid getting one with too high of an intelligence requirement! Spam screaming essences of greed/hatred/wrath/anger until you hit 2x T2+ resists, high life, and an open suffix. You can then mastercraft +20% hybrid resists for a helm that gives 120%+ total resists. If you hit tri-res, with an open prefix you can also just mastercraft a decent life roll (example above). It takes around ~100 essences on average to successfully craft the helm. The frustrating part is buying essences in bulk, as people sell them for only 1-2 at a time usually. The essences themselves are pretty cheap ~1c per. Even if you have bad RNG and it takes 200+ essences, the helm is still going to be cheaper than most unique helms w/ barrage enchant. The main challenge is the time-gate for acquiring essences. Boots
Spoiler
The best DPS boot enchant by far is "Adds 45 to 68 cold damage when hit". This is almost always up and gives a ton of damage. I highly highly recommend getting this, even if it requires running lab. "10% ele pen" enchant gives the most theoretical dps but realistically isn't up most of the time (not recommended). "16% attack speed if you’ve killed recently" is a very decent clearspeed option, but only get this one if you're satisfied with single target DPS. You want rare boots with high life + movespeed + resists (~100%+) here. Don't spend a lot on boots unless it has an insane amount of resists. You can easily self-craft a pair with high movespeed/life and 100%+ resists. Grab a two-toned base, use high tier essences of Wrath/Anger/Hatred until you hit a pair with high life + high movespeed + 1 resist (guaranteed by essence) + open suffix. Then mastercraft a 20% hybrid resist. This pair will give 100%+. The more resists you stack here, the higher your potential DPS ceiling will be b/c it'll allow you to stack more damage mods on your jewelry. Avoid boots with high intelligence requirement. Get one with an int req below 113! 3.9 Trade Link for Boots
Spoiler
https://www.pathofexile.com/trade/search/Metamorph/3qGw6GZc5 All boots in this search have 100%+ resists, 70+ life, and 30%+ movespeed. Feel free to adjust the filters depending on your budget. I suggest stacking as much resists here as you can afford in order to save suffixes on rings for +1 minimum frenzy mastercraft. Amulet
Spoiler
Hyrri's Truth provides a good amount of damage + lower Precision reservation cost. This allows you to use the full aura + herald setup without needing an Enlighten 3. On top of this, you get a good amount of damage from multi + flat phys/cold. The only real drawback is lack of life + resists, but this is a very strong option earlier in league. For endgame you want a Rare Amulet with life and mostly damage. A T1 crit multi suffix is the best DPS multiplier but will of course be beaten out by combinations of other mods. Refer to the trade link below to find a serviceable amulet. +1 minimum frenzy is the best mastercraft for single target damage if you use Voidfletcher. Rare quiver users on the other hand should go for +1 Power/Endurance. You can also include some resists here if necessary. The example above was crafted <5c and was enough for content up to Uber Elder. Hopefully you'll be able to find/craft a better one. I'll try to add a better example later on. 3.9 Trade Link for Amulets
Spoiler
https://www.pathofexile.com/trade/search/Metamorph/jWwV2ObiX
All amulets in the search should have 50+ life. Adjust the weighted sum value ("Min") depending on your budget. Keep in mind I assigned an open suffix the same weight as +1 minimum frenzy but this applies only to Voidfletcher users. If you're using rare quiver instead, replace the value (368658) with 128000. This will represent the DPS contribution from +1 Minimum Power Charge. The filter doesn't factor in attribute requirement, so you might end up having to take an extra Str/Int node on the tree. If this could happen to your setup, you might want to consider making the filter stricter by adding an extra "161250" to the minimum weighted sum value to account for the wasted passive point. Anointment
Spoiler
THIS NEXT PART IS EXTREMELY IMPORTANT FOR DYING SUN USERS SO PAY CLOSE ATTENTION Anoint Profane Chemistry (1 black + 1 silver + 1 verdant oil). You MUST also do two things. 1) Take the entire Primal Spirit cluster (node above AND below the notable). 2) Mastercraft the hybrid prefix (1 exalt) that gives 12+% flask effect + %reduced charges gained on your belt. REMEMBER YOU MUST ROLL 12% OR HIGHER OR ELSE YOU WON'T GET THE EXTRA PROJECTILE. IF YOU ROLL BELOW 12%, USE DIVINES. This anointment + Primal Spirit cluster + 12% belt flask effect + Pathfinder ascendancy will enable you to reach the 50% threshold. This is absolutely essential for Dying Sun to give +3 projectiles. I swear if I got a chaos for every person who screws up here, I'd have multiple 5k stacks of exalts. For those not planning on using Dying Sun, you have several options. If you need some extra resists, Holy Dominion is solid (2 azure + 1 crimson) as is Snowforged (1 sepia + 1 black + 1 azure). For max damage, take Throatseeker (1 amber + 1 violet + 1 opalescent). For good damage and a little bit of flat life take Master of Force (2 black + 1 opalescent) Rings
Spoiler
I will be adding more ring options in the future. Alternatives currently on my mind are: Taming, Circle of Fear/Guilt, rare elder LGOH rings..
Mark of the Elder is an affordable DPS option. You need to pair it with a shaper ring base to get the ~80% increased attack damage. You want a rare shaper ring with decent mods on it to go with Mark of the Elder. Look for life, resists, and damage. If you go with Assassin's Mark on hit just keep in mind it'll override the Proj Weakness from your CWDT setup, thus lowering your potential DPS ceiling. However it'll be up more consistently than Proj Weakness and you'll have max power charges while mapping. My advice is don't go out of your way to get that mod. If your ring happens to have it, great. If not, oh well. The example above was self-crafted with <5c and was used to kill Uber Elder. Try to get something much better though (I'll try to find better examples later in league) 3.9 Trade Link for Shaper Rings
Spoiler
https://www.pathofexile.com/trade/search/Metamorph/q9Y94J9Fg
To use the trade link, simply click "Show Filters" at the top right and then input values into the "Min" box to the right of "Weighted Sum". I've arbitrarily set the default at 450000. This value represents the minimum DPS a ring will give, so raising it will lead to a stricter search w/ better rings at a higher cost. Add a new filter if you need resists. I set an empty suffix = 368658 b/c +1 minimum frenzy mastercraft is worth that much, but this only applies to Voidfletcher users. If you're using rare quiver replace that value with "128000" to represent +1 minimum power charge. All rings on the filter by default have 50+ life roll. Chest
Spoiler
Loreweave is the best chest for this build. The 78% max res mod makes you tankier in general against ele damage and unaffected by -max res maps. The crit chance, %WED, attributes, flat phys, and even some flat life are all very useful for the build. Especially now that fossil mods were nerfed, this is definitely better than a rare chest. Gloves
Spoiler
Hrimsorrows are the best glove option now that multimodded gloves were nerfed and Watcher's Eye became more rare. These gloves + Winter Spirit on tree provide 90% phys conversion. Sadly there's no easy way to get the last 10% so you won't be phys reflect immune. They also give some cold resists, a little flat cold, and strength. If you want more DPS in this slot go for a good corruption. For Voidfletcher users, the best is attacks have +% to critical strike chance. For rare quiver users, +1 max frenzy is the best. %attack speed and %max life are decent options as well. Rare Conversion Gloves
Spoiler
Section coming soon
Belt
Spoiler
Rare Belt
Get a belt with high life + open prefix + %damage. I suggest 60%+ total increased damage. This includes %increased WED, cold damage (frigid fossil), elemental damage (prismatic fossil), and %global physical damage (jagged fossil). For those with Dying Sun, you want to mastercraft 12%+ flask effect in the open prefix. This is is hybrid mod that also gives 20% reduced flask charges gained. Make sure your roll is 12%+, not 11%. Otherwise you'll need to divine it. The craft cost is 1 ex. This mastercraft along with Primal Spirit cluster, Pathfinder ascendancy, and Profane Chemistry amulet anointment will provide you with +1 projectile from Dying Sun. If you aren't using Dying Sun, go with a lower %flask effect roll (~8% regular mod or ~10% hybrid mod + reduced charges gained) for the lower craft cost.. Even without the extra Dying Sun projectile, this mod still gives a bit of damage + more defenses from flask so it's better than your other options. 3.9 Trade Link for Belts All the belts above have high life, 40+% damage and an open prefix slot for crafting %flask effect. Feel free to modify the filter depending on your budget + resists you need. Headhunter if you can afford it. Boosts your clearspeed significantly. You should still own a stygian vise for difficult bossing situations like Uber Elder. Try not to get any resists on your bossing belt. Go for life, pure damage + flask mods instead. Jewels
Spoiler
Summary
Spoiler
Your finalized jewel setup should consist of:
1 Watcher's Eye 1 Abyss jewel w/ Blind on Hit socketed in Stygian Vise 3 Rare DPS jewels ideally w/ life + 2-3 DPS mods 1 Corrupted Blood immunity jewel w/ some damage mods/life Optional replacements for Rare DPS jewels: Lioneye's Fall if you want more damage, less life. You gain about ~10% more DPS but you lose ~8% life. I don't recommend Lioneye's Fall for 3.9 Lethal Pride can beat out a rare DPS jewel but very dependent on RNG Watcher’s Eye
Spoiler
A single-mod Watcher's Eye will provide decent damage, but it's not something essential to the build. Even the best Watcher's Eye mod gives DPS equal to only ~2.5x rare DPS jewels. So if you're contemplating getting one, consider if the price tag is worth an an extra 1.5 rare jewel's worth of damage. 2-mod Watcher's Eyes though are a different story... Tier 1: Precision Multi // Hatred Pen Whichever one gives more DPS really depends on your specific setup. For most people though I think Precison Multi will usually give a little more DPS, but for maps with certain mods like "enemies have +% ele res, or "enemies gain endurance charge on hit", Hatred Pen will be objectively better. Tier 2: Hatred Crit Hatred Crit is 20-30% worse than the Tier 1 eyes, but still very good. Tier 3: Hatred Flat Cold // Precision Attack Damage // Hatred Cold Damage These eyes give barely more DPS (~1-2%) than a rare jewel so probably avoid them unless they're really cheap. Tier 4: Hatred Conversion // Precision Attack Speed Don't even bother with Precision Attack Speed it's complete trash. If you're using Hrimsorrows + rare quiver, Hatred Conversion gives DPS similar to a rare jewel, but it's main selling point is phys reflect immunity. If you do swap out Hrimsorrows for a pair of conversion rare gloves (which you should if using this eye), Hatred Conversion could be as good if not better than a Tier 1 eye depending on good your rare gloves are. However, if you're using Voidfletcher, Hatred Conversion is bad for DPS b/c it doesn't scale Void Shot's damage so it'll be worse than even a rare jewel. Lioneye's Fall (Not Recommended in 3.9)
Spoiler
Lioneye's Fall will give you around ~10% more damage but at the cost of ~8% life. I don't think the trade-off is worth it this patch especially b/c damage should be fine in a fully-geared setup. Survivability is more important. Plus, being a bow league this jewel will be damn expensive. Better off just using a rare jewel. But if you prefer that extra damage boost and care less about tankiness, go for it. You'll need to remove Forces of Nature/Revenge of the Hunted and the leech node near Vaal Pact. You'll also need to connect to Blood Drinker from the right rather than the left side. I suggest taking the jewel socket above Blood Drinker from the right side as well for those 2 int nodes. This could save you from having to spec into a +30 int node.  - socket in the location shown above. The yellow circle surrounds the nodes affected by this jewel. - Soul Raker notable provides all the leech for this build. If you decide to use Lioneye's Fall, you won't need any regular leech nodes on tree. - getting Corrupted Blood immunity on here is a huge QoL, but understandably very expensive. Abyss Jewels
Spoiler
3.9 trade link (Abyss jewels): https://www.pathofexile.com/trade/search/Metamorph/027Y6RdFg All abyss jewels in the trade link have a decent flat life roll + blind on hit as well as some damage. Modify the value in the "Min" box to the right of "Weighted Sum" to adjust the strictness of the filter depending on your budget. Get mainly non-abyss jewels for the tree (other trade link below!) Regular Jewels
Spoiler
3.9 trade link (Non-abyss jewels): https://www.pathofexile.com/trade/search/Metamorph/X3wL00KtP Set the Min value lower/higher on the filter depending on your budget. Note that some abyss jewels may show up here, and you'll be okay using those for the tree as well. One thing to keep in mind though is that the life roll on abyss jewels is a bit worse than %life from regular jewels, so if you use too many of them, there will be a slight reduction to your total life pool (relative of course). When choosing between jewels with similar DPS/cost, avoid ones with attack speed IF you're using Voidfletcher. This is because even though attack speed scales your barrage DPS, it doesn't scale Void Shot DPS, so the filter's weighted values for attack speed rolls are an overestimate.. Corrupted Blood Immunity Jewel
Spoiler
You'll eventually want a rare jewel with “corrupted blood cannot be inflicted on you” implicit to run a 4th unique dps flask such as Wise Oak/Atziri's Promise instead of a life/utility flask. A well-rolled one can be very expensive so get one with 2-3 useful mods for cheap. Regular corrupted jewels tend to be cheaper than abyss ones. This implicit gives us the freedom not to use a staunching flask. However, the tradeoff is slight loss of damage when using a life flask since it's very hard to find a good jewel with this implicit. Keep in mind that it only protects against corrupted blood from nemesis rares/bloodlines magic mobs, not regular bleeds. But b/c Kinetic Blast is excellent at screen clearing, most mobs won’t be able to inflict normal bleed. If you do suffer one once in a blue moon, you can usually outleech it or worst case scenario, log out. The benefits of not using a staunching flask far outweigh the drawbacks. Lethal Pride
Spoiler
Check the two locations shown below before rerolling with a divine orb. Added mods on notables circled in red are guaranteed because they lie on the main path. The notables circled in green represent nodes that you could consider taking if a very good mod is added such as "10% chance to Intimidate on Hit" or "5% double damage". You should aim for at least "intimidate on hit" and 1 additional dps mod such as 20% phys damage or 5% double damage. Another option is to roll at least 2-3 damage mods (5% double damage or 20% phys damage). You could also keep +20% fire resist if it allows you to substitute a resist on your jewelry for another +1 minimum charge. Some good defensive mods are: Endurance charge on kill, 4% max life, 10% reduced damage from crit strikes. *in Location 1, Forces of Nature should be circled in red, not green (sorry too lazy to update picture)* Location 1: "good"  Location 2: "meh"  Flasks
Spoiler
Example Setups
Spoiler
- for general mapping. - for maps w/ less life recovery rate mod + certain bosses like Uber Elder/Shaper (replace Warding with the Order/Acceleration). - for delving. I highly recommend using 4x DPS flasks for mapping + most boss encounters. Swap in life flask (Bubbling prefix recommended) for maps w/ %less life recovery rate and certain bosses like Shaper/Uber Elder. This will require a jewel w/ Corrupted Blood immunity. Diamond flask of the Order/Warding This %crit chance suffix provides a huge chunk of dps for bossing so make sure to get it as soon as possible. For mapping, use Diamond of Warding instead b/c of curse map mods. Being immune to enfeeble + TC will give more damage than "Order" for those types of maps, and being vulnerability/ele weakness immune is pretty important too. Dying Sun Still the best flask for bow builds. Provides the most DPS and clearspeed, but is very expensive this league. I suggest using Wise Oak in the meantime if you can't afford it, but this flask really is irreplaceable in an endgame setup. Taste of Hate This flask gives you a lot of tankiness and the phys as extra cold is a solid dps boost. Essential if you want to do T16+. Wise Oak One of the best DPS flasks available. Works best with Taste of Hate to keep your cold resists as highest. If you aren't using TOH make sure your cold resists are in fact the highest of the three. This is the flask you should be using prior to getting a Dying Sun. Atziri's Promise Gives DPS similar to Wise Oak and also adds a very good amount of chaos resists. Definitely worth including in your setup most of the time. Quicksilver of Adrenaline/Order This flask is a must-have for clearing maps quickly. Try to get "Alchemist's" prefix for even more movement speed. For suffixes you can either use "Adrenaline" for max movespeed or "Order" (% movespeed + %chance to avoid stun) for a balance of mobility and stun immunity. Staunching Life Flask Go with a Catalysed or Bubbling life flask. I prefer Bubbling for the less life recovery map mods, and Catalysed for every other situation requiring a life flask. I'm not a fan of seething flasks, because it barely recovers any life, and doesn't provide any duration for bleed immunity. Basalt Flask/Cinderswallow Urn For Minotaur/Purifier or prevention from one-shots during Betrayal/Legion encounters, go with basalt flask of staunching. Cinderswallow is a good flask for extra clearspeed/safety while mapping/Delving. It gives a lot of dps, especially with the crit chance veiled mod, but you may have trouble sustaining for bossing situations. If you prefer these alternative flasks, replace either the Wise Oak or Atziri's Promise. Gem Setup
Spoiler
Barrage Single Target Setup
Spoiler
- you must have Blood Rage active to fully take advantage of Energy Leech. Lightning Arrow Clear Setup
Spoiler
- I prefer this setup for most map layouts. Feels sort of like KB, you shock/chill pretty much everything. Ice Shot Clear Setup
Spoiler
- similar feel to Lightning Arrow. - if you spam your attacks too much, replace Hypothermia with Inspiration. Tornado Shot Clear Setup
Spoiler
- this setup was better for wide open layouts due to 360 degree coverage. But now with GGG's nerfs in 3.9, I don't recommend T-Shot over Lightning Arrow/Ice Shot. - if you encounter mana problems, replace Hypothermia with Inspiration. Aura/Herald Setup
Spoiler
- Enlighten 4 isn't necessary, but does give another 20-30 mana for some nice QoL. - if your Herald of Ice is in a white socket, you can potentially swap to Herald of Purity for high-stakes boss encounters. This will give you a bit more DPS, but I don't recommend it for regular mapping. Curse on Hit + Cold Exposure + Flame Dash Setup
Spoiler
- Flame Dash is better than Blink Arrow because lower cooldown time, 2 less sockets required, and a faster cast rate. Build is already socket starved so these 2 extra gem sockets are extremely important. - keep CWDT at lvl 1, Projectile Weakness at lvl 5 (20+q), and Wave of Conviction at lvl 7 so that it procs as often as possible. - this setup gives a lot of DPS and will proc in almost all situations where you actually need it. - make sure Flame Dash isn't linked to the other 3 gems or else you can't use it... - can also replace Projectile Weakness with a defensive curse like Temporal Chains/Enfeeble. Utility Setup
Spoiler
- keep Steelskin at lvl 16 and CWDT at lvl 11. - Vaal Haste is optional for some extra burst dps. You can also go with Vaal Grace for extra dodge. Alternative Gem Links
Spoiler
- who likes micromanaging portal scrolls? - some attacks can chain off the golem and wreck you. I personally dislike golems for that reason and also too annoying to constantly refresh. Editado por útlima vez por Enahkra#7073 en 5 ene. 2020 6:12:09
|
|
|
Post 3
>>>>>>>>>>>>>>>>>>{ Physical Conversion Wander }<<<<<<<<<<<<<<<<<<  *Gif is outdated in 3.9 due to massive boss life + resist buff* Mirrored wander guide has been moved to the following thread: 2236445 ****Int-Stacking CI Wander (Alternative to Physical Conversion) written by TTL****
Spoiler
Introduction by Enahkra
Spoiler
3.9 balance changes have greatly nerfed the DPS ceiling of phys conversion wanders (bad news), while at the same time reducing the cost required for reaching end-game levels of damage (good news). In terms of DPS, it's inferior to phys conversion bows. In terms of survivability it's inferior to int stacking wanders. Both alternatives however require a decent level of investment (~20 ex).
The phys conversion wander is a good league-starter and is capable of doing all content, but this requires more skill + will feel less comfortable than the other two builds. This is why I recommend switching to either int stacking (if you favor greater tankiness) or phys conversion bow (if you favor much higher damage) once you can afford to. One additional point to make about int-stacking wanders is that gearing up will be more personalized, but also more complicated. Your setup will consist of mostly rare items and self-crafting might be necessary for some items, so the overall build cost/performance results are more dependent on RNG + your own knowledge. " 3.9 Update (READ THIS FIRST)
Spoiler
Due to the multimod nerf, ~60% of the info on this guide had to be removed. Hopefully in the near future GGG reduces the severity of the nerf so I can put those sections back into the guide.
Power Siphon as a single target skill beats Barrage in virtually every category now. Overall character progression has improved due to better damage in the earlier stages of gearing. This is b/c of how Power Siphon DPS is calculated. You're no longer dependent on items like Dying Sun + helm enchant for a large portion of your DPS. In fact, you can do content up to Uber Elder without Dying Sun at all. LMP buffs also make it possible to run both LMP + GMP in most KB setups, replacing Dying Sun's usefulness as a clearspeed flask. Dying Sun is still the best all-around flask, giving solid single target and KB DPS. However, the single target DPS from it is now surpassed by Atziri's Promise/Wise Oak (I still recommend it though if you can easily afford it; it might come in handy if this build stands any chance in the Awakener fight). The multimod nerf ended up hitting high end wanders the hardest by making it near impossible to craft end game wand + jewelry. To reach the 3.8 DPS ceiling (~10mil Shaper DPS), you'll likely have to spend double the amount (~50 ex instead of ~25 ex). If you invest ~25 ex you'll likely hit a wall at around ~7mil Shaper DPS this patch. On the other hand, barrier of entry for this build is now roughly twice as low (~8 ex instead of ~15 ex). I've confirmed you can do content up to Uber Elder w/ this budget, but players with no prior bossing experience will struggle at first. Overall, you can still achieve respectable levels of DPS (~5-6mil). It's just the old DPS ceiling isn't as easily achievable. GGG decided to buff endgame boss life significantly, some stats to keep in mind are: Shaper is now 68mil HP (from 18mil) Uber Elder/Shaper each now have 44mil HP (from 18mil) T16 Shaper Guardians now have 30mil base HP (from 12mil) These aren't the only bosses that got buffs, nor is it the only buff they got. On top of the life buff, they got a resist buff as well (now 50% instead of 40%). What this means is that every build is going to feel noticeably worse for bossing in 3.9, b/c all builds now take 3-4x longer for each endgame boss fight. This is GGG's intention to make sure we actually play the mechanics rather than instant delete the bosses. Despite this, everything up to Uber Elder is still very doable, but you'll have to play more carefully + master the content a bit more. To partially compensate for extended boss fights, I suggest using 4x DPS flasks by replacing a life flask and only swapping for it in certain situations (ex: Chimera/Shaper/Uber Elder/etc.). Many of the endgame fights like Elderslayers, 3 out of the 4 Elder guardians, and 90% of red map bosses don't require one. We also lose the LGOH rings from 3.8 that nearly doubled our life recovery and made % less life recovery map mods easier to do. Now I recommend using a life flask when running % less life recovery maps, or at least playing more conservatively. Changelog
Spoiler
12/14 - revised leveling + gem sections.
12/15 - overhauled most of the wander guide; will add more details in the future 12/24- replaced Enhance with Frost Bomb in Poet's Pen; this is to counter the regen metamorph bosses Introduction
Spoiler
There were two main reasons why I wrote this guide.
One was to provide an alternative way of building a wander, and help get rid of the stigma associated with phys conversion wanding. I wanted to get people to stop believing many of the reddit myths about phys wanding that continue to be circulated despite being no longer true or were never true to begin with. Examples include: "phys wanders aren't viable unless you spend hundreds of exalts", "phys wands cost 20+ ex", "an ele wander can easily beat phys with much lower cost", etc. The other reason was to provide the community with a wander template tailored towards comfortably farming end-game content with as low a barrier of entry as possible. Most wander guides out there focus on quickly clearing low-tier maps. As a result, they are usually poorly optimized for dealing with end game bosses. This guide is my attempt at filling that niche for those who love the wanding playstyle, but prefer bossing over repeatedly farming low-tier maps. The build has evolved quite a bit since it was first conceived, and will continue to evolve in response to GGG's balancing changes. I've had to gradually abandon aspects of phys conversion to keep the build optimized every patch. It's very possible that in the future this build will transition into pure ele scaling. Between preserving the character of the build vs. maximizing damage output, I will always go for the latter. For now, we can call it a phys conversion ele wander ;) NOTE: This wander was built with farming end-game bosses in mind. For those wanting to run low-tier maps with MF, read the section under General Topics. Can I afford this build?
Spoiler
Poet's Pen, especially w/ a good corruption, is perfectly viable for completing all content including Uber Elder assuming you follow the guide accurately.
You also want a 6L Loreweave and ~5 ex for the "budget" version. This can get you through all map bosses, shaper, and most likely Uber Elder depending on your skill. There are many vids on this guide showing you how to approach the Uber Elder fight as a wander. You also need to be competent enough to level up to at least 90+. For those with less bossing experience, you probably need to invest a few exalts more or make playstyle improvements. Pros and Cons
Spoiler
Pros:
- enjoyably fast clearspeed. - pleasant crunchy crit shatters all the time. - good enough single target dps for all content up to Uber Elder. - high damage ceiling. - you'll baffle all your friends by playing a phys wander in 2019! Cons: - it's a life wander on the right side of the tree, so not an inherently tanky build. Expect to die occasionally when farming end-game bosses. - not meant for people who don't level their builds past the 80s. Wanders require a decent character level to function smoothly, especially for end-game. Level 90-93 is a decent place to stop if you despise leveling, although lvl 95+ is recommended. It's very easy to level nowadays, just hoard Niko missions and delve. - Power Siphon is not the easiest single target skill to use. - not meant for farming very deep in delves. Can probably farm depths ~350 comfortably, but go deeper at your own peril. - bossing requires actually engaging with game mechanics. Not a mindless faceroll meta build. Offense/Defense Summary
Spoiler
Offense
Just to make things clear, this isn't a physical wander in the sense that we deal mainly physical damage. We focus rather on converting most/all of the phys from our wand into cold damage. On top of this, we also scale some efficient sources of flat cold. Therefore this wander is technically a hybrid between a phys conversion and an ele wander. For simplicity's sake we will just call it a "phys wander". We convert/invest in cold instead of lightning/fire for 4 main reasons: 1) Winter Spirit node cluster makes it super easy to convert. 2) Hatred is the best dps aura especially with the change to a "More" multiplier for cold damage. 3) Cold pen from the tree is easily accessible. 4) Cold damage provides chill/freeze which greatly helps with survivability by slowing down enemies and keeping them at a distance. Defense Power Siphon requires you to facetank within melee range, which isn’t the most pleasant way of tackling a boss. To try to address this problem, we steer away from heavy investment in rng-dependent defenses and focus more on overall tankiness, although keep in mind that wanders in general are very glassy. ~5-5.5k life, but you can reach higher if you sacrifice some damage (6k+). 78% all ele resists from Loreweave ~78% overall chance to avoid attacks (includes dodge/evasion/blind etc.) 6% reduced elemental damage taken 30% physical damage taken as cold damage from Taste of Hate. This is equivalent to ~1300 extra life against large physical hits Steelskin procced by CWDT absorbs 70% of incoming damage up to ~1-1.5k depending on gem level. This reduces your chance of getting KOed by consecutive large hits Shield charge procs fortify, granting 20% reduced damage from hits. This is equal to an additional ~1000 life Other damage mitigations on gear, flasks, pantheon etc. Map Mods
Spoiler
This build can safely do most map mods. The ones I would definitely avoid are ele/phys reflect and no leech. You can do phys reflect if you swap out your DPS ring for Sibyll's Lament, but that's super annoying. Consider using a life flask in 60% less life recovery maps or else they can sometimes be pretty rippy.
GENERAL TOPICS/RECOMMENDED READING
Spoiler
Pathfinder vs. Raider vs. Deadeye
Spoiler
For this patch, Pathfinders are objectively superior to Deadeye/Raider for bossing b/c of the huge buff to boss HP and resists. Boss fights are now ~3-4x longer so you will want the longer flask sustain. Plus Pathfinder is the tankiest Ranger ascendancy. Tailwind on crit can now be rolled on boots + projectiles aren't as important for scaling single target, so the only advantage to Deadeye is slightly more clearspeed but the tradeoff isn't worth it. Raider is just a less tanky/lower DPS version of Pathfinder with less flask sustain.
Weighted Modifiers/Comparing Different Mods
Spoiler
I will update the values for this section soon. The concept of "weighted modifiers" lets us compare different damage mods to determine which is better. To do this, we assign point values to each mod type depending on how much damage it gives. This is what we mean by "weighted". I've arbitrarily assigned the point value of "1" to "1% increased damage". Every other mod's point value will be relative to this mod. So for example, 1% attack speed gives about 2.5x more damage than 1% increased damage. Therefore, I assign each 1% attack speed the point value of 2.5. When you compare 10% increased attack speed vs. 10% increased damage, you know that the attack speed roll is much better: 10 x 2.5 = 25 points. 10% increased damage is only 10 x 1 = 10 points. As a rule of thumb, ~8 points translates into 1% more total dps. Understanding how to use weighted modifiers will be extremely helpful if you're buying your items instead of self-crafting. It's also helpful if you need to make adjustments to my setup. Keep in mind, these point values are merely estimates, but very good estimates. They do not apply to other builds, only this one. Also, the point values will vary between individual setups, but not by much because I've outlined very specific items to buy/craft. So for example, your build might value attack speed at 2.6 points, whereas another person might value it at 2.4 points but numerical differences that small won't matter unless you're even more anal about optimizing than I am. Another important thing to note. There are many %increased damage mods like %fire, %cold, %lightning, %phys, %ele, %projectile. They aren't all worth the same due to how this build scales damage. We convert all our flat phys to cold, but ~50% of our damage comes from flat cold. This means %phys only scales the former but not the latter, which is why they're only worth ~0.5 points. %cold applies to all converted phys damage as well as our flat cold sources, which is is why %cold = %WED = 1 point. Similarly, barrage is a projectile skill, so %increased projectile damage is fully effective = 1 point. HOWEVER, %fire and %lightning are not very good for this build, because we avoid flat lightning/fire. We do this for optimization purposes because you get more damage by focusing on penetration scaling in a single element rather than all three. This is why %fire and %lightning are worth almost ~0 points and I didn't even bother including in the list. The weighted mods are listed below: Reference List: 1% increased damage = 1 point 1% increased global physical damage = 0.5 point 1% increased cold damage = 1 point 1% crit multi = 2 points 1% increased elemental damage (with attacks) = 1 point 1% increased projectile attack damage = 1 point 1% increased attack speed = 3 points 1% non-chaos as extra chaos = 5 points 1% ele pen = 6.5 points 1% increased damage while leeching = 1 point 1% physical damage as extra cold = 2.5 points 1% physical damage as extra fire/lightning = 1 points 1 flat phys = 2 points (Add min + max values and divide by 2) 1 flat cold = 1 point (Add min + max values and divide by 2) 1 flat fire/light = 0.5 point (Add min + max values and divide by 2) +1 to minimum frenzy charge = 45 points +1 to minimum power charge = 22 points 1% cold damage as extra chaos = 5 points 1% chance to deal double damage = 8 points 1% increased global critical strike chance = 0.6 point (based on effective crit chance of ~81%, if your crit chance is <81% expect this point value to be higher) 8.5 points = ~1% more damage Each dps node on tree gives ~3% more damage = 26 points Stun
Spoiler
Stuns can be an issue, especially at the start of the gearing process when our life pool is small. Before you've acquired your end-game setup, use the Brine King Pantheon. Also take Heart of Oak on the tree for 20% chance to avoid stuns. Once you reach ~5k life, stuns become much less of an issue, although it still does happen occasionally, especially for certain high phys damage encounters like Syndicate.
One thing you can do to virtually eliminate getting stunned altogether is to use a Quicksilver of "Order" rather than "Adrenaline". There is an "Order" flask suffix that gives 50% chance to avoid getting stunned + 12% movement speed. Pathfinder scales this up to 75% and 18% respectively. When stacked w/ Heart of Oak, you have ~95% stun avoidance aka virtual stun immunity. The main drawback is that you lose some movement speed from not having the "Adrenaline" suffix. If you have a lot of currency to spend, keep in mind that the new Awakener's Orb can apply 2 influence types to an item. So you can craft a ring that's both Shaper + Elder. In that case, when paired with Mark of the Elder, you'll also have the stun immunity mod, which solves the stun issue. Mana Sustain
Spoiler
Power Siphon eats up mana like crazy, so to even sustain it you must have 1 mana leech node on the tree. A common mistake is taking a second mana leech node on tree. That is absolutely useless b/c you reach your cap with just one node. Taking a second is a waste of a point.
Since your ability to sustain mana requires successfully hitting the boss with Power Siphon, missing your first several attacks can be disastrous because you run out of mana. When you run out of mana, you can't sustain either mana or life. This is usually followed by instant death. My advice is just practice practice practice. Do not spam Power Siphon at a target moving laterally relative to you, b/c most of your projectiles will miss. Do not Power Siphon unless you're confident you'll hit the boss. Pay close attention to whether or not your projectiles are actually connecting with the boss b/c sometimes it just doesn't for some weird reason. If you're in a situation where you need to fire from a distance, don't spam it, fire in bursts to make sure the projectiles are connecting. All this comes with experience. Skills Overview
Spoiler
Auras/Heralds + Accuracy
To reach 100% hit chance, we need around 700 accuracy rating. Luckily, a Precision aura gives 701 accuracy as well as a lot of %crit chance. You might still have 99% hit chance depending on the amount of dex on your gear. In this case a lvl 21 Precision is recommended to reach the 100% threshold. In addition to Precision, we use Hatred and a herald. I chose Herald of Ice over Herald of Purity although both provide around the same dps boost. Herald of Ice gives satisfying shatters and enhances AOE clear. Mobility + Other Skills We move through maps using a combination of Shield Charge + running. For no regen maps, you'll have to rely more on running b/c you sometimes can't sustain Shield Charge. For me personally, I shield charge 70% of the time, and run 30% of the time. Shield charge is preferred over running in most scenarios b/c it's faster + we can proc fortify granting us more tankiness. Some people may take an auxiliary movement skill like Flame Dash/Dash for navigating platforms and dodging boss mechanics. Blood Rage is mandatory because it gives decent damage + frenzy charge generation. If you hate the degen, try to socket it in your shield that way you can weapon swap quickly to stop the degen whenever you want. Steelskin serves as an extra defensive layer to protect against two-shots. KB has two setups depending on whether or not you're using Dying Sun. If you have one, go with the traditional KB setup (WED + Pierce + GMP). If you can't afford a Dying Sun, use a Wise Oak instead and replace WED with LMP. For most setups you should still have enough DPS for endgame trash clear. MF/Speed-Farming Alternative
Spoiler
Use Deadeye Ascendancy as it's superior for clearing easy content and makes your KB much better.
You can first start by juicing up KB with a 6 link. I suggest testing out Faster Attacks/LMP/Faster Projectiles/Chain/Fork/Greater Volley; if you find your damage lacking, you can put in Inspiration/Added Cold/Hypothermia/Cold Pen/Increased Crit Damage/Ice Bite. A 75% KB explosion helm enchant should be prioritized. This is a huge damage multiplier and comes with no drawback to mana cost. Its damage is equivalent to an extra gem link. There's also the generic MF items including QOTF, Sadima's, corrupted Pariah/Ventor's, Bisco's etc. that can easily be incorporated into the setup. Goldwyrms might be doable too if you have a lot of resists elsewhere. If you have no desire to farm end-game content and only want to run low-tier maps all day, and especially if you're broke, ele wanders are a much better option. A very good guide I've seen for this is Thi3n's KB Deadeye mapper (guide on forums). Ele wanders have two main advantages over phys: 1) they can run phys reflect while using a Sadima's and 2) they can utilize Esh's Mirror. This shield provides a shit ton of flat damage and enables ele wanders to run low-tier maps on an extremely low budget. Power Siphon vs. Kinetic Blast
Spoiler
You could use Power Siphon instead of KB as your clear skill, but it's definitely worse for clearspeed. I'll quote Mathil here: "The best way to enjoy Power Siphon is to forget Kinetic Blast exists." There's really no reason I can think of for using Power Siphon over KB unless you just want to try something aesthetically different.
Here's the gem links: These are the exact same gem colors as the traditional KB setup, so you can swap between the two skills whenever you feel like it. Lvl 21 Power Siphon adds an additional projectile so that's something to prioritize. Dual Wield vs Shield
Spoiler
Let's consider what dual wielding gives us that shields don't: 10% more attack speed and 20% more physical damage. We also get access to Twin Terrors cluster, which provides lots of crit chance, and dual wield multi jewel mods.
This build isn't a true phys conversion wander because it's extremely expensive to make a real one in temp leagues. Abyss jewel nerfs in 3.7 were the final nail in the coffin for this ever being viable. Therefore the build derives only ~50% of its flat damage from phys sources. This is why the 20% MORE physical damage multiplier from dual-wielding isn't that great because you only get to utilize a bit over half of that multiplier. We also have to consider what we give up in order to dual wield too. We lose a shield slot that gives high flat life + some damage/resists. The lower life pool could result in dual wielders needing to get more life nodes on the tree, which is counterproductive. We also lose our ability to proc Fortify, and some good shield nodes and mods on jewels. The 18% crit multi mod for dual-wielders is definitely the best dps mod possible on a jewel, but it's only a little better than 8% attack speed with wands, which works for shields as well. Plus, this build doesn't use that many rare jewels, so the net contribution from those mods are minimal (~3-4%). KB and Power Siphon rely on both mainhand and offhand wands alternating attacks which means you need at least two similar-dps wands which will increase the build cost significantly. That amount of currency could get you a really nice shield and better gear in other places. Plus, this doesn't even factor in the additional cost from having to get more resists elsewhere which means you'll have to sacrifice damage in other places to remain resist-capped. Taking all this into account, you will definitely gain some damage from dual wielding, perhaps 5%, at most 10% when controlling for all other variables like life + resists. But the drawbacks of less tankiness far outweigh the advantages in my opinion. The build's biggest weakness is survivability, not damage. The general takeaway is much higher cost and less survivability for the tradeoff of slightly more damage. Videos
Spoiler
3.9 Deathless Shaper w/ <10 ex Budget (boss life was buffed by nearly 400% this patch) 3.9 T16 Elderslayer (Al Hezmin) w/ <10 ex Budget 3.8 Deathless Uber Elder w/ white wand Pathfinder 3.8 Deathless Uber Elder w/ Poet's Pen + Tabula Pathfinder 3.8 Deathless Uber Elder w/ Pathfinder 3.8 T16 Minotaur w/ Pathfinder Path of Building Pastebin
Spoiler
I'll likely optimize the POBs throughout league so check back here occasionally for updates.
Just an FYI I included DPS inflation from Vaal Haste in these two POBs so you might want to uncheck that for a more accurate reflection of DPS 3.9 Budget Setup https://pastebin.com/4Rdw2UQ0 3.9 Expensive Setup https://pastebin.com/ChjnSSA6 Leveling Section + Order of Upgrade
Spoiler
Leveling as a wander at league-start is usually both frustrating + slow, and breaking into maps can be a nightmare if you're unlucky. This is why you should level with Toxic Rain. It's an extremely smooth + easy process. The only drawback is that you eventually have to spend around ~15 regret orbs to respec in addition to all the respec points you receive from side quests. This cost is well worth it as Toxic Rain can carry you up to early maps with no investment and save you from hours of struggling.
Below is a link (credit goes to whoever wrote it) with a very detailed step by step guide for leveling with Toxic Rain. You should follow everything in this link except DO NOT FOLLOW THEIR PASSIVE TREE. This is because respeccing from their tree will cost you a shitload of regrets (40-60). I've instead provided a tree that's a bit less optimal but requires much less respeccing. Your damage will still be fine throughout the leveling process and early maps. Click here for link. Toxic Rain Passive Tree(s)
Spoiler
30 points:
61 points: 82 points: 98 points: If you're struggling with mana, take Druidic Rite. Re-specced Tree: Here are some key points you need to know. Read carefully:
Spoiler
- level as either a Raider or Pathfinder. Raider will have a smoother progression through the campaign and early maps, but this comes with a heavy respec cost later on (30 regrets).
- reach Blood Aqueducts as quickly as possible and begin powerleveling there until you reach ~lvl 75. Make sure to level up your KB + Power Siphon + aura setups in your offhand/spare sockets. Complete Merciless lab before you switch to wander. - you must acquire the following items + reach lvl ~75 before respeccing: Thief's Torment + Poet's Pen + Tabula + Hrimsorrow (THESE 4 ITEMS ARE ABSOLUTELY ESSENTIAL). Belt of the Deceiver is also cheap and will carry you a long way. For your helm, boots, shield, focus on getting resist capped + flat life. For your amulet slot, try to get some damage mods like crit chance/multi/flat cold or phys + life/res if needed. To make enough currency for this gear, just keep chaining Blood Aqueduct instances, do chaos recipes, and sell your Humility cards until you can afford it. - for gem setup after transition, make sure you have 4L KB and 6L Power Siphon. Also make sure you have Blood Rage + Shield Charge/Fortify. For auras, use only Precision + Hatred until you can afford Hyrri's Truth, then add in Herald of Ice. - MAKE SURE YOU SOCKET WAVE OF CONVICTION + PROJECTILE WEAKNESS IN YOUR POET'S PEN. For the 3rd socket, you can use a lightning/ice golem temporarily. - if you reach lvl ~75 and you're still nowhere close to being able to afford all the required items, go ahead and start running T1-T5 maps with Toxic Rain, but make sure to be resist capped. - use Soul of the Brine King pantheon at first because you get stun-locked quite often w/ a low health pool. Transition to Solaris/Lunaris once you reach ~4k life. - this setup should carry you through all white + yellow tier maps until you reach lvl ~85. Once you reach T10 maps, you might begin to notice a drop-off in damage/tankiness (boss fights start to take noticeably longer). To compensate you should buy a Hyrri's Truth at this point to enable Herald of Ice. If you prefer a larger mana pool for shield charge, use a lvl ~14 Precision gem instead of the lvl 22 one from Hyrri's Truth. Recommended Order of Upgrade AFTER switching to wander:
Spoiler
1. Set up live search (check jewel section) for 4x dps/life jewels. You can get endgame jewels for ~1-10c early on, and ~15c-1 ex mid-league. Also set up live search for 1 blind on hit Abyss jewel. All relevant info is found in the Jewels section.
2. Make sure you get these 5 flasks ASAP: staunching life flask, Wise Oak (your cold res must be highest), Atziri's Promise, diamond of warding, quicksilver of adrenaline. 3. Complete Uber Lab. 4. Begin leveling Power Siphon + Added Cold gems in your offhand weapon sockets. You want to get 21/20 Power Siphon ASAP because this gives you 1 additional projectile! Once you acquire this, go for 21/20 Added Cold (second best damage boost), followed by aura gems (quality doesn't matter). 5. Get a Hyrri's Truth. This gives good damage and will enable you to run Precision + Hatred + Herald of Ice without requiring an Enlighten 3. 6. Get a Taste of Hate. Consider temporarily replacing either Wise Oak or Atziri's Promise. This will increase your tankiness by a decent amount. 7. Read the section on resist capping to figure out how much you need to squeeze onto your ring, amulet, boots and belt. Begin acquiring the rest of your gear. 8. Get flat cold enchant on boots (Uber Lab). 9. Replace Tabula w/ 6L Loreweave (do this later if it's too expensive). 10. Reach lvl 90+. Remember your flat damage on Poet's Pen scales per 3 levels, so if you want to stop leveling, a decent place is lvl 93. 11. Look for enchant on Starkonja/Fractal Thoughts/Obscurantis. These are't really necessary though. 12. Replace one of your jewels with a corrupted blood immunity one (to enable you to use 4x DPS flasks). 13. Save up for Watcher's Eye (Hatred flat cold is ~2x better than all the other mods). 14. Get a corrupted Poet's Pen (ele pen = crit chance > attack speed > flat cold). If you're loaded enough, get a double corrupted one. 15. Get a corrupted Hrimsorrow (attacks have +% base crit > %attack speed > %life > +1 frenzy. 16. Get the woke gems. GMP for extra KB projectile. Added Cold is best for damage followed by: WED + Ele Focus. I'm still in the middle of theorycrafting for 3.9 so gear setup is subject to change at any time throughout league. Make sure to check back occasionally. Gearing Strategy
Spoiler
The general strategy is to concentrate your resists in several slots, especially the boots. You'll need to get a combined ~225% total resists on all your rare slots. Your boots can easily get 100%+, leaving ~125% across your ring, amulet, belt, and possibly jewels. This isn't hard to achieve since a ring base alone gives ~30% resists, and your belt can easily carry 40-80%. Worst case scenario, don't use Unyielding Flame (you can probably find a better shield on poe.trade anyway), or take Snowforged cluster on tree (+20% res) or replace a damage suffix on jewel.
If you're slightly undercapped you'll probably be okay for most encounters. Most setups will be using Wise Oak/Taste of Hate anyways which will help you maintain res cap. Since you're Pathfinder, flasks will be up ~98% of the time. And for those moments when you aren't paying attention, you probably won't get hit. The cardinal sin of gearing up is overcapping on resists. There's no point since a warding flask will take care of Ele Weakness maps. If you want the most optimal DPS you must NEVER way overcap (a few % above is ok). Every %resist you get above 78% (from Loreweave) is DPS going down the drain. Editado por útlima vez por Enahkra#7073 en 4 ene. 2020 14:39:48
|
|
|
Post 4
Gear
Spoiler
Wand
Spoiler
Since multimodding is now nerfed in 3.9, it's very difficult to self-craft a phys wand. For this league I suggest using Poet's Pen as your end-game wand and spending your currency on other slots. I'll add a wand crafting section later for those interested in trying their luck. It's safe to say you'll need to hoard deafening essences of contempt and it'll cost many exalts on average. If you have currency to blow, I suggest a double-corrupted Poet's instead.
Poet's Pen
Spoiler
This wand, especially with one of the following implicits: %ele pen = %critical strike chance > %attack speed > flat cold is perfectly viable as an end-game option, assuming you're using solid gear in all your other slots. Get one with as high an attack speed roll as possible. Every 1% local attack speed is directly equal to 1% more DPS. The reason Poet's Pen can even remotely compete with a rare wand in damage is due to constant proccing of the two socketed gems: Wave of Conviction + Projectile Weakness. These two skills combined grant Cold Exposure (25% cold pen), and the multiplier: "enemies take ~54% increased damage". The latter mod is pretty much a huge "more" multiplier even when the damage buff from Proj Weakness is scaled down during Guardians/Shaper/Uber Elder fights. One disadvantage to Poet's is that in Hexproof/reduced curse effect maps, it's noticeably weaker b/c you lose the curse but that's not really an issue 99.9% of the time. For your Poet's Pen, socket at least Projectile Weakness + Wave of Conviction. For the 3rd socket I recommend Frost Bomb if you're playing Metamorph League. Why Frost Bomb when we already have cold exposure from Wave of Conviction? Because Frost Bomb also reduces the boss life regen. Certain metamorph bosses have a ton of regen making the fight undoable without it. Curse on Hit does not work with Poet's Pen and using one will make it bug out. Chest
Spoiler
Loreweave is the best chest for this build. The 78% max res mod makes you tankier in general against ele damage and unaffected by -max res maps. The crit chance, %WED, attributes, flat phys, and even some flat life are all very useful for the build. Especially now that we can permanently generate Power Charges and fossil mods were nerfed, this is definitely better than Farrul's Fur/rare chest. Shield
Spoiler
Treat this as a versatile slot for filling out your resists and getting some extra damage. You have two options. A rare shield or Unyielding Flame. Unyielding Flame is good on a budget if you can't find a decent rare one, but rare shields can stack more resists + damage so if you have more currency definitely go with a good rare shield. 3.9 Trade Link for Shields
Spoiler
https://www.pathofexile.com/trade/search/Metamorph/d8PazwZIJ
To use the search, simply click "Show Filters" at the top right and then input minimum values in the box to the right of "Weighted Sum". For example, if I want a shield with at least 50 points of damage, I simply input the number "50" into the "Min" box and it'll provide all shields with combinations of mods that add up to give you 50 points of damage. 1 point gives the same DPS as 1% increased damage. If you're confused about how weighted sum works go read the earlier section on weighted modifiers I set an empty suffix = 38 points b/c 5% double damage mastercraft is worth that much. Similarly an empty prefix is worth 28 points b/c the best mastercraft-able prefix is worth that much (%cold as extra chaos). Avoid shields that have both an open prefix and suffix! I still don't know a good way to filter those out yet. If you need resists too, modify the weighted sum value for the resist filter below. Keep adjusting these two values until you find the best shield you can afford. Keep in mind that an Unyielding Flame gives ~70 points of damage + ~60% total resists, so don't set minimums lower than that. Helm
Spoiler
The new Power Siphon + Barrage Support mechanics makes the helm enchant less important for endgame DPS, but if you can afford to, try to get the +2 power siphon enchant. Other cheaper/easier to find options are: Power Siphon +1 proj // Wave of Conviction -%resist // Power Siphon %attack speed // Power Siphon %damage // Blood Rage %attack speed. These will give around half the DPS of a +2 PS enchant.
You can also go with a KB explosion enchant if you're satisfied with single target DPS. Starkonja's Head is the best budget option. Make sure you're using Precision, not Herald of Purity. This'll probably be the easiest helm to get a decent enchant on. Fractal Thoughts is probably the BIS DPS helm for this league. Make sure you're using Precision, not Herald of Purity. If you can get a +2 PS enchant on here it'll beat out Starkonja's for both DPS and life (but not by much), assuming you take more life nodes on tree. If you're deciding between Starkonja with enchant vs. Fractal Thoughts without enchant, go with the Starkonja's. Obscurantis gives roughly the same DPS as Starkonja's but requires replacing Precision with Herald of Purity. You will also have slightly lower mana pool as well. It's still a solid budget option since this is considered a trash tier unique. You probably won't be able to find an enchant on it though. This option is here just for those who want an excuse to actually use this helm. Boots
Spoiler
The best DPS boot enchant by far is "Adds 45 to 68 cold damage when hit". This is almost always up and gives a ton of damage. I highly highly recommend getting this, even if it requires running lab. "10% ele pen" enchant gives the most theoretical dps but realistically isn't up most of the time (not recommended). "16% attack speed if you’ve killed recently" is a very decent clearspeed option, but only get this one if you're satisfied with single target DPS. You want rare boots with high life + movespeed + resists (~100%+) here. Don't spend a lot on boots unless it has an insane amount of resists. You can easily self-craft a pair with high movespeed/life and 100%+ resists. Grab a two-toned base, use high tier essences of Wrath/Anger/Hatred until you hit a pair with high life + high movespeed + 1 resist (guaranteed by essence) + open suffix. Then mastercraft a 20% hybrid resist. This pair will give 100%+. The more resists you stack here, the higher your potential DPS ceiling will be b/c it'll allow you to stack more damage mods on your jewelry. 3.9 Trade Link for Boots
Spoiler
https://www.pathofexile.com/trade/search/Metamorph/3qGw6GZc5 All boots in this search have 100%+ resists, 70+ life, and 30%+ movespeed. Feel free to adjust the filters depending on your budget. I suggest stacking as much resists here as you can afford in order to save suffixes on rings for +1 minimum frenzy mastercraft. Rings
Spoiler
I will be adding more ring options in the future. Alternatives currently on my mind are: Taming, Circle of Fear, rare elder LGOH rings..
Mark of the Elder is an affordable DPS option. You need to pair it with a shaper ring base to get the ~80% increased attack damage. You want a rare shaper ring with decent mods on it to go with Mark of the Elder. Look for life, resists, and damage. I don't recommend Assassin's Mark on hit b/c it will override the Proj Weakness from your Poet's Pen, leading to lower overall DPS. The example above was self-crafted with <5c and was used to kill Uber Elder. Try to get something much better though (I'll try to find better examples later in league) 3.9 Trade Link for Shaper Rings
Spoiler
https://www.pathofexile.com/trade/search/Metamorph/YpD0X36sY
To use the search, simply click "Show Filters" at the top right and then input minimum values in the box to the right of "Weighted Sum". For example, if I want a ring with 45 points of damage, I simply input the number "45" into the "Min" box and it'll provide all rings with combinations of mods that add up to give you 45 points of damage. 1 point = 1% increased damage. If you're confused about how weighted sum works go read the section on weighted modifiers I set an empty suffix = 42 points b/c +1 minimum frenzy mastercraft is worth that much. Similarly an empty prefix is worth 20 points b/c the best prefix you can mastercraft is worth approx. that much. Avoid rings that have both an open prefix and suffix! I still don't know a good way to filter those out yet. If you need resists too, modify the weighted sum for the resist filter below. Keep adjusting these two weighted sum values until you find the best rings you can afford. All rings on the filter by default have 50+ life roll. Ring Anointments
Spoiler
The best tower anointment for this build is anything glacial cage related. Examples are:
20% increased Cooldown Recovery= 1 teal + crimson oil 25% increased Duration = 2 sepia oils 25% increased Range = 1 azure + 1 teal oil Enemies inside Glacial Cage take 10% increased Damage = 1 opalescent + 1 clear oil This last mod is by far the best, but comes at a higher oil cost. The basic strategy for every Blight encounter is to upgrade to glacial cages as quickly as possible. Those things are OP b/c they not only trap monsters but KB damage also becomes insane against anything in them. You can kill Unique Blight bosses with KB even faster than w/ Power Siphon if they get trapped in one. Even if some portals are resistant to cold damage you should still upgrade glacial cages b/c they still trap monsters. Belt
Spoiler
Rare Belt
You no longer need +1 projectile from Dying Sun, so get a belt with high life + WED. I suggest 60%+ combinations of %increased damage. This includes %increased WED, cold damage (frigid fossil), elemental damage (prismatic fossil), and generic damage (mastercraft). High %flask effect is no longer necessary, but it's still a good option for buffing your damage + tankiness from flasks, so I still recommend it. 3.9 Trade Link for Belts All the belts above have high life and 60+% damage or 40%+ damage with an open prefix slot for crafting %flask effect/damage. Feel free to adjust the strictness of the filter depending on how much resists you need + your budget. Headhunter if you can afford it. Boosts your clearspeed significantly. You should still own a stygian vise for difficult bossing situations like Uber Elder. Try not to get any resists on your bossing belt. Go for life, pure damage + flask mods instead. Gloves
Spoiler
Hrimsorrows are the best glove option now that multimodded gloves were nerfed and Watcher's Eye became more rare. These gloves + Winter Spirit on tree provide 90% phys conversion. Sadly there's no easy way to get the last 10% so you won't be phys reflect immune. They also give some cold resists, a little flat cold, and strength. If you want more DPS in this slot go for a good corruption. The best is attacks have +% to critical strike chance, followed by %attack speed. %max life is decent as well, and +1 max frenzy can help for map clearing + bosses. Rare Conversion Gloves
Spoiler
Section coming soon
Amulet
Spoiler
Hyrri's Truth provides a good amount of damage + lower Precision reservation cost. This allows you to use the full aura + herald setup without needing an Enlighten 3. On top of this, you get a good amount of damage from multi + flat phys/cold. The only real drawback is lack of life + resists, but this is a very strong option earlier in league. For endgame you want a Rare Amulet with life and mostly damage. A T1 crit multi suffix is the best DPS multiplier but will of course be beaten out by combinations of other DPS multipliers. Refer to the trade link below to find a serviceable amulet. +1 minimum frenzy is the best mastercraft for single target damage. You can also include some resists here if necessary. The example above was crafted <5c and was enough for content up to Uber Elder. Hopefully you'll be able to find/craft a better one. I'll try to add a better example later on. 3.9 Trade Link for Amulets
Spoiler
https://www.pathofexile.com/trade/search/Metamorph/yY94ZKOfR
All amulets in the search should have 50+ life. Adjust the weighted sum value ("Min") depending on your budget. Keep in mind I assigned an open suffix the same weight as +1 minimum frenzy b/c that's what I expect most people to craft. If you don't plan on using +1 frenzy, ignore or remove the empty suffix weight. The filter doesn't factor in the value of attributes from the amulet implicit, so you might end up having to take an extra Str/Int node on the tree if you pick an amulet with a useless implicit such as Gold/Paua. If you want to make those bad-implicit amulets more acceptable for your setup, make the filter stricter by adding an extra "125000" to the minimum weighted sum to account for the potential passive point you might waste speccing in +30 str/int. Anointments
Spoiler
Go with Prism Weave (2 opalescent + 1 sepia). This node gives a lot of damage. The %pen is very much needed now that GGG buffed boss resists.
Jewels
Spoiler
Abyss jewels were nerfed in 3.7, so go with non-abyss jewels in all your passive tree sockets. Make sure each jewel has at least %life + 2-3 damage mods. Life + multi + attack speed with wand/shield is the best 3-mod combo. Attack speed with wands is the best mod since it can roll up to 8%. With shields is a bit worse (up to 6%).
Both Blind on hit/Onslaught on kill mods are available on either murderous or searching eyes. I recommend you get one w/ at least Blind on Hit for your stygian vise. A 3 mod jewel with multi/attack speed is typically better than a 4 mod jewel with only %increased damage rolls, so don't be fooled and overpay. Ideally you want the following: 1 Watcher's Eye 2 cobalt jewels with multi/attack speed with wands/life 1 decent rare jewel w/ corrupted blood immunity 1 abyss jewel with blind on hit + life + onslaught or damage mod Abyss Jewels
Spoiler
3.9 trade link (Abyss jewels): https://www.pathofexile.com/trade/search/Metamorph/027Y6RdFg All abyss jewels in the trade link have a decent flat life roll + blind on hit as well as some damage. Modify the value in the "Min" box to the right of "Weighted Sum" to adjust the strictness of the filter. I set it to 15 as default, but feel free to raise or lower this value depending on your budget. Get mainly cobalt jewels for the tree (other trade link below!) Regular Jewels
Spoiler
3.9 trade link (Non-abyss jewels): https://www.pathofexile.com/trade/search/Metamorph/velWyaBiE Set the Min value lower on the filter if you can't afford any of the jewels listed. Note that some abyss jewels may show up here, and you'll be okay using those for the tree as well. One thing to keep in mind though is that the life roll on abyss jewels is a bit worse, so if you use too many of them, there will be a slight reduction to your total life pool (relative of course). When choosing between jewels with similar DPS/cost, go with the one that has higher attack speed b/c this will help your shield charge/clearspeed as well. Watcher’s Eye
Spoiler
Tier 1: Hatred Flat Cold This is the best Watcher's Eye for damage. If you can afford one, get this mod. Tier 2: Hatred Pen // Hatred Crit // Precision Multi These eyes still give good damage but are ~30% worse than Hatred Flat Cold. The gap widens further if you get a pen or crit corruption on Poet's Pen. Tier 3: Hatred %increased Cold Damage // Precision %increased attack damage Both are 30% worse than Tier 2 Watcher's but still give a decent amount of damage. Tier 4: Hatred Conversion // Precision Attack Speed These eyes give the least amount of DPS, barely more than a rare jewel. Conversion gives less DPS than attack speed when using Hrimsorrows but you'll be able to run phys reflect maps and use rare conversion gloves. If you decide to go w/ rare conversion gloves you might be able to get damage equal to Tier 2 Watcher's, but this requires a very good pair. Lethal Pride (Alternative to Rare Jewel)
Spoiler
 This jewel adds a mod to each node in its range. The socket just below Heartseeker is usually the best spot. This will give you one extra mod on each of the four notables: Forces of Nature, Heartseeker, Winter Spirit, and Herbalism. You also get +4 strength per small node and +2 strength per travelling node which adds up to 40+ strength! You should also check the notable: Flash Freeze. If there's a good added mod on it like %double damage/Intimidate on Hit, you should consider freeing up 2 points to take this notable. Before each reroll, check around every socket location on the tree in case there's some sleeper OP combo somewhere. (excluding the sockets near Point Blank + Acrobatics b/c the keystones will be wiped) On one of the 3 notables, you ideally want "10% chance to Intimidate Enemies for 4 seconds on Hit". This is a very good damage multiplier. If the jewel you own doesn't add this mod to any of the 3 notables, you can throw a divine orb on it to reroll its "seed" and check again. At the moment no one understands what the relationship is between seed number and mod combination so I can't tell you exactly how many divines this would take. Therefore you might be fine stopping once you hit 5% chance to deal double damage + 2 other useful mods Intimidate on hit seems to be pretty rare, so keep in mind that two 5% double damage mods gives slightly better damage than Intimidate on hit. A Lethal Pride with a good seed is way better than a perfect 4 mod cobalt jewel and probably cheaper too. The following are all the useful mods Lethal Pride provides for this build (ranked somewhat subjectively from best to worst): 10% chance to Intimidate Enemies for 4 seconds on Hit 5% chance to deal double damage 4% increased maximum life 5% chance to gain an Endurance Charge on Kill 10% increased Effect of Fortify on you 20% increased Physical Damage 5% of Physical Damage from Hits taken as Fire Damage You take 10% reduced Extra Damage from Critical Strikes +20% fire resistance Corrupted Blood Immunity Jewel
Spoiler
You'll eventually want a rare jewel with “corrupted blood cannot be inflicted on you” implicit to run a 4th unique dps flask such as Wise Oak/Atziri's Promise instead of a life/utility flask. A well-rolled one can be very expensive so get one with 2-3 useful mods for cheap. Regular corrupted jewels tend to be cheaper than abyss ones. This implicit gives us the freedom not to use a staunching flask. However, the tradeoff is slight loss of damage when using a life flask since it's very hard to find a good jewel with this implicit. Keep in mind that it only protects against corrupted blood from nemesis rares/bloodlines magic mobs, not regular bleeds. But b/c Kinetic Blast is excellent at screen clearing, most mobs won’t be able to inflict normal bleed. If you do suffer one once in a blue moon, you can usually outleech it or worst case scenario, log out. The benefits of not using a staunching flask far outweigh the drawbacks. Flasks
Spoiler
Example Setups
Spoiler
- for general mapping. - for maps w/ less life recovery rate mod + certain bosses like Uber Elder/Shaper. - for delving. I highly recommend using 4x DPS flasks for mapping + most boss encounters. Swap in life flask for maps w/ %less life recovery rate and certain bosses like Shaper/Uber Elder. This will require a jewel w/ Corrupted Blood immunity. Diamond flask of the Order/Warding This %crit chance suffix provides a huge chunk of dps for bossing so make sure to get it as soon as possible. For mapping, use Diamond of Warding instead unless you have it somewhere else, b/c it helps a lot with curse map mods. Being immune to enfeeble + TC will give more damage than "Order" for those types of maps, and being vulnerability/ele weakness immune is pretty important too. Taste of Hate This flask gives you a lot of tankiness and the phys as extra cold is a solid dps boost. Essential if you want to do T16+. Wise Oak One of the best DPS flasks available. Works best with Taste of Hate to keep your cold resists as highest. If you aren't using TOH make sure your cold resists are in fact the highest of the three. If you decide to use Dying Sun instead, replace this flask with it. Atziri's Promise Gives DPS similar to Wise Oak and also adds a very good amount of chaos resists. Definitely worth including in main setup. Quicksilver of Adrenaline/Order This flask is a must-have for clearing maps quickly. Try to get "Alchemist's" prefix for even more movement speed. For suffixes you can either use "Adrenaline" for max movespeed or "Order" (% movespeed + %chance to avoid stun) for a balance of mobility and stun immunity. Dying Sun Not essential in 3.9 due to new Power Siphon mechanics. You can actually get slightly more DPS using Wise Oak instead. The only advantages come from the %less fire damage taken (good against Phoenix/maybe Awakener?) and more projectiles for KB. Staunching Life Flask Go with a Catalysed or Bubbling life flask. I'm not a fan of seething flasks, because it barely recovers any life, and doesn't provide any duration for bleed immunity. Basalt Flask/Cinderswallow Urn For Minotaur/Purifier or prevention from one-shots during Betrayal/Legion encounters, go with basalt flask of staunching. Cinderswallow is a good flask for extra clearspeed/safety while mapping/Delving. It gives a lot of dps, especially with the crit chance veiled mod, but you may have trouble sustaining for bossing situations. If you prefer these alternative flasks, replace either the Wise Oak or Atziri's Promise. Gems
Spoiler
lvl 21/20 Power Siphon should be the first gem you try to corrupt b/c you get one additional projectile. lvl 21/20 Added Cold Damage should be the second. Lvl 21 Hatred/Precision is also pretty easy to get b/c quality doesn't matter. Socket multiple of these in your offhand.
Power Siphon setup (chest)
Spoiler
- Vaal Power Siphon doesn't do anything so don't pay extra for it. - to take full advantage of Inspiration, spam Power Siphon for ~1 second prior to engaging the boss. This allows you to reach maximum inspiration charges at the beginning of fight rather than building it up during. Kinetic Blast setup(s) (gloves)
Spoiler
+ - this is the regular setup for those w/ Dying Sun. If you don't have a Dying Sun, you can also use this setup, but I recommend trying out the other setup first. + - this is the ideal budget setup for those without Dying Sun. LMP provides the additional projectiles, but the drawback is loss of WED. We therefore use Wise Oak to partially compensate. Overall this setup gives a bit less KB DPS but slightly more single target DPS than the original setup. - if you find yourself lacking the DPS to clear consistently with this setup, you'll just have to deal with having 2 less projectiles or get a Dying Sun. Aura + Heralds setup (helm)
Spoiler
- Hatred is essential no matter what. - Precision is mandatory unless you use Obscurantis helm. We get most of our hit chance from here. - you will need at least an Enlighten 3 to squeeze in your full aura + herald setup. - Herald of Ice is mandatory for the damage and clearspeed boost, but you may not have enough mana to use it early on. - Replace Precision with Herald of Purity if you're using Obscurantis helm. Poet's Pen single target setup (wand)
Spoiler
- this has to go in your Poet's Pen or else your DPS will be awful. - socket them in the exact order shown here (from top to bottom). - get all three gems as high level/quality as possible; quality on Projectile Weakness is the most important. - this setup scales your single target skill significantly. Without it, we wouldn't be using Poet's Pen. - Frost Bomb is to reduce boss life/ES regen and adds a little damage (very useful for Metamorph bosses) - Projectile Weakness is the best dps curse, but knock-back effect can be annoying when barraging map bosses. If you aren't doing high-tier maps all the time, swap it for Elemental Weakness. CWDT setup + Blood Rage (shield)
Spoiler
- Blood Rage provides a huge damage buff and frenzy charges while mapping. If you don't like the degen, only activate it for single target situations. We socket it in shield so that you can quick-swap weapons to end the degen effect when you aren't engaging monsters. - don't go higher than lvl 14 CWDT and and lvl 18 Steelskin. Most likely you won't meet the strength requirement anyway and will have to settle for lower level. Shield Charge + Fortify setup + Utility Gem (Boots)
Spoiler
- Shield Charge into the boss/mobs every few seconds to maintain fortify buff. This will improve your survivability a lot by essentially adding ~1000 more ehp. - Faster Attacks is optional but gives a lot of QOL. With it, you can use Shield Charge as your main method of moving around (instead of running). - Flame Dash or Vaal Haste in the last socket depending on preference (try both). Passive Tree/Bandits/Ascendancies/Pantheon
Spoiler
YOU MUST TAKE A MANA LEECH NODE ON TREE OR ELSE BUILD WON'T FUNCTION
There is an optional cluster that you can remove/take depending on your own playstyle: Phase Acrobatics This requires 4 spare points. Phase Acro will improve your ability to facetank at the cost of damage and/or life. Level 95 Passive Tree Pathfinder Ascendancy Nature's Boon --> Master Alchemist --> Veteran Bowyer --> Nature's Adrenaline Bandits Go with Alira... she gives a lot of resists and juicy crit multi. Pantheon Major Gods: Lunaris/Solaris each have their merits. Solaris is better for high-end bossing. If you're using a golem, you may want to take Lunaris to prevent enemy attacks from chaining off your golem. Minor Gods: Upgraded Shakari helps with strongbox opening and poison maps. This is preferred for general mapping. Upgraded Yugul is the best for Uber Elder. Playstyle Tips
Spoiler
Make sure you're doing the following:
- using all your flasks (except life) on a constant basis every 3-4 seconds. - clearing the packs surrounding the boss before using Power Siphon (or else it auto-targets and you'll die from missing + lack of leech). - making sure your Power Siphon proj is actually hitting the boss; at the start of the fight always pay close attention to where your barrage projectiles land. If they all "pass through" the boss and fly offscreen that's a sign you're missing; readjust your cursor position accordingly. - don't bother Power Siphoning the boss if he's moving around too much. Instead, focus on re-positioning, reapplying fortify, clearing adds, etc. until the boss becomes stationary again, then proceed to attack. You can also run up to the boss to get him to stop moving while simultaneously applying fortify. - re-positioning/dodging with shield charge occasionally when facing difficult bosses, while hitting something along the way, either a mob or the the boss itself in order to proc Fortify. - don't spam shield charge too many times in a row while moving between packs, or else you might not have enough mana to sustain barrage if you get caught off guard. - re-position more often if the boss deals too much damage for you to facetank; if you're low on life flask charges, fire off 1-2 volleys of Power Siphon between each re-position in order to maintain healing. Try to move around the boss in a tight circle to keep it stationary, or else your projectiles will miss more often. - using basalt flask instead of life flask on Minotaur/Enslaver so you can face tank and not have to worry about boss mechanics. - start barraging phoenix once you reach the center of the arena, and sidestep as he spins towards you. This allows you to deal some damage to him before he begins his first explosion. You should be able to tank his explosions directly for almost all mod combinations. - using a recovery life flask instead of an instant one is useful for many situations, such as Chimera. - don't get surrounded and attacked by more than 1-2 Legion rares/Syndicate members at a time. If you encounter a situation where there are multiple Syndicate members/Legion rares targeting you, shield charge to proc fortify and kite to spread them out. Kill them one at a time. Being surrounded by multiple and trying to facetank all of them will probably get you killed b/c they deal heavy physical damage. Editado por útlima vez por Enahkra#7073 en 25 dic. 2019 12:49:29
|
|
|
sick bro !!!!. nice build <3
|
|
|
Nice!! Finally an updated phys wander build I can follow :) Been so tired of playing ele wanders
|
|
|
Thanks for the great writeup! Looking forward to trying out a phys wander again :)
|
|
|
Hello, i want to know why wouldn't this build be viable in HC? I haven't played wand builds for the 3 last years but i wanted to play one in this league.
|
|
" Hi thanks for bringing this up. I guess it just depends on what one considers viable. Any build is hardcore viable if you spec into enough defenses.I only meant to say that the tree + gear I recommended in the guide would not be optimal for high level hardcore content. A phys wander will still be much tankier than an ele wander though because we can utilize taste of hate. I just meant to say that wanders in general because they are located on the right + top of the tree and aren't naturally high dps and the fact that single target requires facetanking bosses just wouldn't be the best choice of a hardcore build, but you can definitely get it to work if you aren't running any crazy content in hardcore. |
|
|
Thanks a lot :) ok i understand, of course i will adapt the tree for HC. I just have zero knowledge about wand builds in this game.
Will maybe try it out when i die but not sure, and let's hope i don't die. :D |
|


